hexo blog 테마 변경하기 2

마누라와 자식만 빼고 다 바꿔라

삼성전자 회장 - 이건희

 저는 마누라는 커녕 여자친구도 없으니 전부 바꿔보도록 하겠습니다.

Prologue

Aria Blog Sample
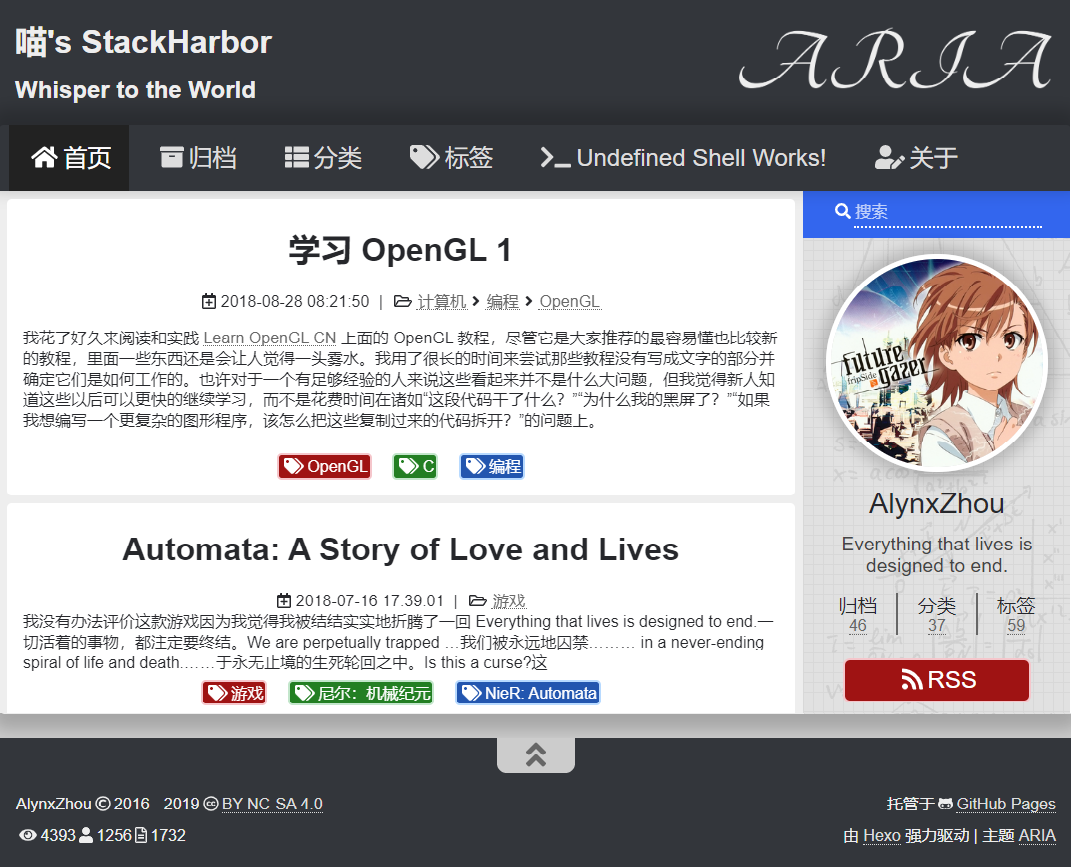
aria blog sample
 sample은 aria theme을 만든 Alynx Zhou의 blog입니다. 취향은 존중해야 하니 변경할 부분들만 다시 확인하도록 하겠습니다.


변경할 부분
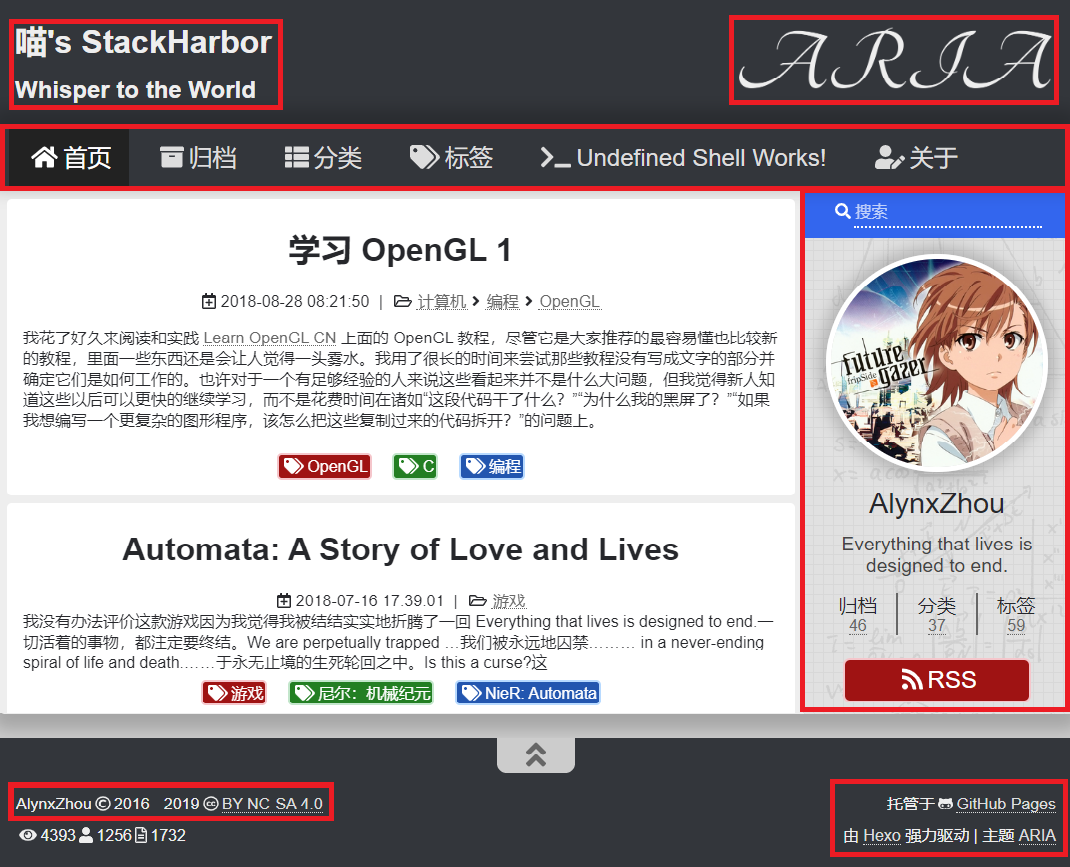
change parts

  • Header 설정(blog 이름, Aria 로고 지우기)
  • 메뉴바 설정
  • 사이드바 설정
  • Footer 설정(copy right 변경, github Pages 링크 변경)
  • Fonts, Code Highlighting

Change Configuration file

Header Setting

Blog name

 일단 블로그의 이름을 먼저 바꿔줘야 합니다. 기껏 만들어놓고 대문에 남의 이름 써있으면 기분이 묘해집니다. 해당 설정은 hexo의 _config.yml파일을 수정합니다.

./blog_root/_config.yml
1
2
3
4
5
6
7
8
# Site
title: ColorLion's IT Blog
subtitle: EZ bloging
description:
keywords: ColorLion
author: ColorLion
language: en
timezone: Asia/Seoul

바꾸는 김에 timezone, language 등을 변경했습니다. 나머지는 적어둘만한 것이 생각나지 않아 생략했습니다.

 aria theme을 사용하긴 하지만 로고는 사용하기 애매한 부분이 있어 없애버렸습니다. 로고는 ./blog_root/theme/aria/_config.ymllogo 부분을 주석 처리 해주는 것으로 없앨 수 있습니다.

./blog_root/theme/aria/_config.yml
1
#logo: images/logo.png

header
블로그의 header가 깔끔해졌습니다.


 메뉴 부분에서는 home, archives, tags, categories 이 4가지만 사용할 것입니다.

_config.yml
1
2
3
4
5
6
7
8
9
10
11
12
13
14
15
16
menu:
- name: home
link: /
icon: <i class="fas fa-home"></i>
- name: archives
link: archives/
icon: <i class="fas fa-archive"></i>
- name: categories
link: categories/
icon: <i class="fas fa-th-list"></i>
- name: tags
link: tags/
icon: <i class="fas fa-tags"></i>
# - name: about
# link: about/
# icon: <i class="fas fa-user-edit"></i>

설정을 변경한 menu입니다. 4가지 항목을 사용했고, about 부분은 나중에 유명해 진다면 사용하는 걸로 합니다.쓰지 않겠다는 말입니다.

Create Tags page

&nbsp;homearchives는 블로그 theme 적용 시점부터 바로 사용할 수 있지만 categoriestags는 따로 만들어 줘야 합니다. 먼저 tags 페이지를 만들어 봅시다.

1
$ hexo new page "tags"

생성된 tags 페이지의 index.md파일을 다음과 같이 변경합니다.

./blog_root/source/tags/index.md
1
2
3
4
5
---
title: All tags
type: "tags"
#date: 2020-03-17 00:00:54
---

tags
tag페이지가 정상적으로 동작하는 것을 확인할 수 있습니다.

Create Categories page

categories 페이지도 만들어 봅시다.

1
$ hexo new page "categories"

생성된 categories 페이지의 index.md파일을 다음과 같이 변경합니다.

./blog_root/source/categories/index.md
1
2
3
4
5
---
title: Categories
type: "categories"
#date: 2020-03-17 00:10:41
---

categories
categories 페이지 역시 잘 동작하는군요

만약 제대로 동작하지 않는다면 위의 _config.yml의 설정중 link 부분을 확인해보시길 바랍니다. 해당 경로는 /blog_root/themes/aria/가 아닌 /blog_root/source/ 에 존재하는 디렉토리로 지정됩니다.


&nbsp;Sidebar는 없애기로 결정했습니다. 올려둘만한 프로필 사진도 없고, 링크를 걸어둘만한 사이트도 없기 때문입니다.

./blog_root/theme/aria/_config.yml
1
2
# `left`, `right`, `false`
sidebar: false

sidebar
초라하게 있는 것 보단 없는게 더 깔끔해 보입니다. 미니멀리즘이 이런건가?라고 생각해보는 시간이었습니다.


&nbsp;github 페이지 링크를 변경하는 작업입니다.

./blog_root/theme/aria/_config.yml
1
2
# Custom info in footer.
custom_info: github<i class="fab fa-github-alt"></i><a href="https://github.com/ColorLion" target="_blank">GitHub Pages</a>

완성입니다.


Fonts/Code Highlighting Setting

Change Fonts

&nbsp;기본 font를 사용한다면 영어는 적용되지만 한글이 적용이 안되기 때문에 변경해주도록 하겠습니다.

./blog_root/theme/aria/_config.yml
1
2
3
4
5
6
7
8
9
10
11
12
13
# Select all your webfont in a CDN like Google Fonts, and then copy `href` property in the `<link>` tag, like `link: //fonts.googleapis.com/css?family=Lato|Roboto+Condensed|Skranji|Ubuntu|Ubuntu+Mono`.
# Then set different fonts to different parts here.
custom_font:
enable: true
link:
- //cdn.jsdelivr.net/gh/moonspam/NanumSquare@1.0/nanumsquare.css
- //cdn.rawgit.com/innks/NanumSquareRound/master/nanumsquareround.css
- //cdn.jsdelivr.net/gh/joungkyun/font-d2coding/d2coding.css
all: 'NanumSquare'
title: 'NanumSquare'
subtitle: 'NanumSquare'
main: 'NanumSquareRound'
code: 'D2Coding'

개인적으로 naver의 폰트를 정말 좋아합니다. 가독성도 좋고 둥글 둥글 하니 귀엽기도 한 것같고 그렇습니다.

Change Code Highlighting

&nbsp;저는 code highlignting은 무조건 atom-one-dark theme을 사용합니다. vscode도 그렇고 theme를 변경할 수 있다면 대부분 atom-one-dark를 사용합니다.

./blog_root/theme/aria/_config.yml
1
2
# Available: atom-one-dark | atom-one-light | solarized-dark | solarized-light
highlight: atom-one-dark

aria theme을 사용하게 된 가장 큰 이유중 하나가 atom-one-dark를 사용할 수 있고, 가장 잘 어울렸기 때문입니다.

Author

ColorLion

Posted on

2020-04-07

Updated on

2022-01-26

Licensed under

Comments